Introduction
My favorite thing to do in this hobby is plan for model railroads that, for the most part, will never be built. I use this part of the hobby to refine my skills at figuring out how yards, tracks, cities and everything else are built for when I build a real model railroad. That being said, this topic is no stranger to me than the interior of my own car and I have done articles on planning several times on this blog. However, what I have not done as of yet is fully explain the planning process.
Planning your model railroad is often important. Though some people manage to get by without much thought of what track goes where, most of us use some method of planning. Here I will go over the two big methods of planning a railroad: planning with paper, and 1:1 scale planning on the layout. Both have their benefits and down falls, and I will also go over that too. Finally, remember the five methods of construction I will be discussing? I will also be going over which method of planning works best for different construction methods.
On the other hand, it is also important to not get stuck in planning. I often have this problem, but I slap my self, and say, "good enough," after a time. If this ever happens to you, just take a deep breath and promise yourself everything will be fine.

Planning With Paper:
Track planning with paper and or computer software is the most common method of planning model railroads for several reasons:

My favorite thing to do in this hobby is plan for model railroads that, for the most part, will never be built. I use this part of the hobby to refine my skills at figuring out how yards, tracks, cities and everything else are built for when I build a real model railroad. That being said, this topic is no stranger to me than the interior of my own car and I have done articles on planning several times on this blog. However, what I have not done as of yet is fully explain the planning process.
Planning your model railroad is often important. Though some people manage to get by without much thought of what track goes where, most of us use some method of planning. Here I will go over the two big methods of planning a railroad: planning with paper, and 1:1 scale planning on the layout. Both have their benefits and down falls, and I will also go over that too. Finally, remember the five methods of construction I will be discussing? I will also be going over which method of planning works best for different construction methods.
On the other hand, it is also important to not get stuck in planning. I often have this problem, but I slap my self, and say, "good enough," after a time. If this ever happens to you, just take a deep breath and promise yourself everything will be fine.
Prior to planning the railroad itself, it is time now to answer several questions:
- What scale will be used? This is important as scale dictates the size of the layout, the type of materials used, and what it will look like.
- What era will the layout be? You can divide the timeline of railroad history many ways. But at the most basic level, will you model steam (prior to 1949), transition (1950-1965), or modern diesel (1965 onward) eras?
- How big will the layout space be? This is VERY important on so many levels, it might require its own article.
With those questions behind you, now you should think about what you want in a railroad:
First part, the elements of a railroad.
I did an article way back about what elements go into a railroad. There are visual elements and practical elements.
Strictly visual elements:
- Scenery
- Buildings (any building not owned or serviced by the railroad)
- Water
- Backdrop/ fascia.
None of these elements affect train operation, but these do:
- yards:
- mainlines:
- industries:
- storage/ staging:
- curves:
- construction:
So let's start with the visual elements. Visual elements are more of an aesthetic pleasure to the eye rather than having a true, useful purpose. These are elements which are often put in place last, like the ground cover, or the color of the water seen in a river. They do not affect train operation in any way, and therefore are necessary on the layout, but is there for one reason, to make the trains look good.
Scenery
 |
| Everything in this scene is under the 'Scenery' category except for the car. |
Scenery is an element that is completely visual, but is included to "complete" a railroad. The scenery is anything seen that is not: water, buildings, or two dimensional objects like backdrops. those others are their own elements as they have a different set of aspects to them. So, trees, fauna, flora, and natural things are under this category. The scenery helps make the layout look natural instead of a mass of framework and foam.
Buildings
 |
| Most of these buildings on the South Dakota State Railroad Museum's HO scale layout are not really serviced by the model trains, therefore they are classified as 'buildings.' |
Buildings, cars, and other man made objects are under this category. Anything in this category are not really there for the trains' sake, but rather for the same purpose of scenery, to complete the layout.
Water

Water is in itself is an element of nature, with its own life and therefore should be considered separately from other natural things. Water is also used as a transportation system, meaning that it is further different from the natural forests.
Backdrop/ Fascia
Backdrops are two dimensional representations of the landscape, while fascias provide an aesthetic appeal to the railroad. These two things can be thought of as the trim on a house, it gives the layout character and a unique look.
So there are the natural elements, but what about the practical elements? A good way to find practical elements on a train layout is to think of something on a railroad that could be its own, independent layout that doesn't need the assistance of anything else. Examples would be yards and terminals which can be modeled on their own just fine.
Yards
 |
| Yards give a layout a place to make and break up trains, send them through, and preform the many maintenance tasks that real railroads go through in keeping a railroad running. |
Rail yards are very important to all but the smallest train layouts. They are the epicenter for where all trains on a layout originate (besides the staging tracks) and take up a considerable amount of space, and job opportunities for operating sessions. With that said, yards can be thought of as their own, separate element.
Mainlines
 |
| The two tracks that circumnavigate the layout are mainlines because all other tracks connect to them. The mainline can also be thought of as the main river, which all the tributaries flow into. |
The mainline is a highway which connects the layout to itself in all places. The mainline may not actually be modeled as a mainline, but anything that allows trains to pass in and out of a scene is a mainline on a layout.
Industry
 |
| Since a grain elevator give a railroad business, it is an industry. Other industries not served by the railroad are less important than those which are on a model railroad, so those industries are classified as 'buildings.' |
Industries give the railroad a purpose. Most industries have buildings, but these buildings are almost required for any industry to exist, making them more practical than aesthetic.
Staging and Storage
 |
| A staging yard represents everything you can't see, such as beyond the horizon in this photo. |
Staging is quite similar to a yard, and therefore this and yards could be put together as one element. except that if you have a decent yard, you don't really need staging. This is only true though if the cars on a layout can all fit onto one yard, which would serve as a terminal. Furthermore, staging and storage represent the national rail network which connects to your little piece of modeled area through the mainline and yards. With that, staging yards and storage can be seen as their own element.
Curves
 |
| There are several reasons why the track curves. Can you think of them? 1. The layout ends a few inches from the track, 2. The trees mark a river which would mean the track needs to curve to get into town. And 3. the town is around the bend. |
Curves are important as they just take up space, and a lot of it. they dictate how wide a railroad will be, outline obstacles which a train can't go through or over, and give the trains a reason to slow down, both in real life, and on the model. Because of these factors, curves are important when planning, constituting their place as an element on a railroad.
Construction
How the layout is constructed is the number one thing to take into consideration as it affects EVERYTHING on the layout. This is part of the reason why I am also going over the different methods of constructing a layout, as it is important to see how X affects Y and exc...
Planning With Paper:
Track planning with paper and or computer software is the most common method of planning model railroads for several reasons:
- It allows people to visualize the railroad without really wasting any lumber or other resources to see if it will work, or even look right in the space available.
- This method of planning will allow a person to devise other diagrams for the railroad including diagrams from wiring, bench work, and lighting.
- The plan can be used to explain to your family why there's a mass of lumber in the den room ;p
- a diagram for the layout will allow a person to see what materials are needed ahead of time such as the amount of track, lumber, and solder for joints.
Track planning on paper actually has its own legend and symbols that are widely known, though everyone has their own variations. The track plan can be thought of as a map, showing where everything on the layout is, or will be. The legend or key to the map are the symbols which represents various things on the layout. I have my own special key which I use, and its below:

- Buildings. Important ones are labeled
- Track. Solid, thick line for exposed track, dotted line for tunnels
- Narrow gauge track. Gauge and scale specified, can also be different color.
- Layout surface. marked by thin, continuous line with corners or curves.
- Elevation. Marked as inches above the layout surface
- Turntable is a circle with a line through it, suggesting the pit and bridge.
- Rivers and water marked by a shaded area bordered by land which can be unshaded, or a green area in color.
- Bridges. Marked by a suggestive trestle or girder type of border.
To me, this is relatively simple, and is a spin off from the track planning symbols used on Model Railroader track plans. Considering its your layout, you can adapt this to anything you want if it is easier to understand, but this is my key, and yes, you are welcome to use it.
To actually draw a track plan, you can see a similar article here which gets into detail about using utensils for accurate drawing. The alternative to this is to create a rougher sketch, but using the same symbols as above. The beauty of my set of symbols is that they are generally understood, and account for measurements and notes about various aspects on the layout. In other words, its universal, no matter how you use it.
Track planning in 1:1 scale
This doesn't mean going out to a real yard and taking their track plans, though you can do that if you like, but rather taking your layout surface, and using it as a canvas for planning your empire. Some people like this method as it gives modelers the freedom to test out different things before being certain of what they want. It is a very good thing when you can see your layout in front of you, and test out what switch goes where and how it is best used. I personally used this method for my own HO scale Rock Springs layout, and it worked great because I could see the pieces of track instead of being forced to visualize. In fact, it wasn't until after the layout was operational that i made a track plan, though I don't advise that because I did have a few headaches.
The basic idea behind this form of planning is to take the elements discussed above, and see them in action on the layout surface without the need for a track plan.
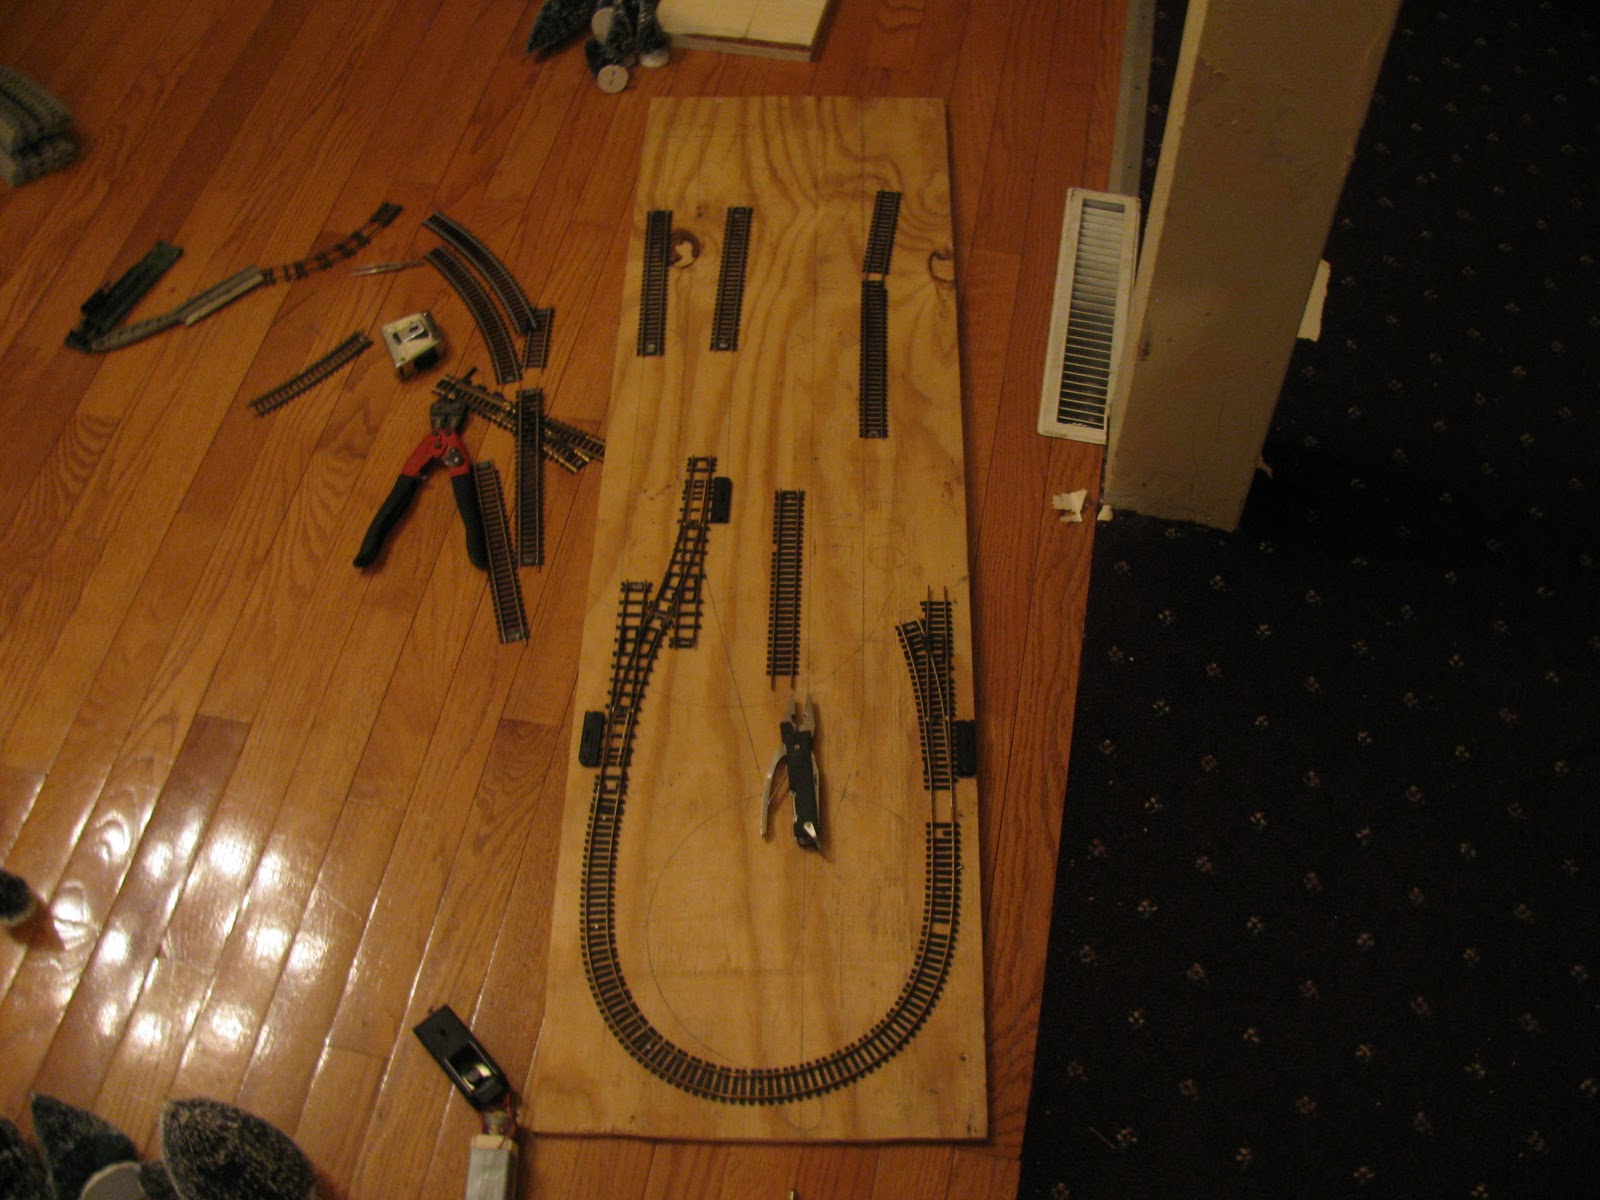 |
| Track planning with the actual track can be great for seeing the layout rather than visualizing it. |
This form of track planning only works in certain situations however, and here they are:
- If you know how big the layout will be
- If you know what you want already
- If you want to see how the track looks and feels like before its too late.
This form of track planning can't work right if one of those things are impossible to complete, or are not done.
So which method of track planning works best for what construction method? Well, here is the answer and why:
- The table top method. You can use both methods of track planning on this style of construction because the layout surface is already there and the track plan would be easy to create.
- The foam board method. With this method, you should use the 1:1 planning idea as it allows for marks to be made, cuts to the foam, and a great flow to the layout.
- The cookie cutter method. Track planning on paper is a good idea here for one simple reason, this way you will know what to cut. This method of construction requires the cutting of a lot of wood, and you need something to "measure twice" with before cutting.
- The foam and plaster method. The 1:1 planning idea works here as the foam needs a reference to cut with. The track, already being marked on the surface, will give a person that stencil for cutting.
- The paper shell method. With the need for lumber to be used as a sub-roadbed, a track plan on paper is worth just as much as a line on the layout surface.
And that is all the reason to do some planning before building your railroad. When the planning is finished, a person can now move on to... wait for it... BENCH WORK!!!!
No comments:
Post a Comment