Old Posts

Showing posts with label building a model railroad. Show all posts

Sunday, April 1, 2012

Part 3, Model Railroad Benchwork

So far in this series, we have gone over planning for a model railroad.  Planning is fun and all, but breaking out the tools and getting to work on the bench work is a great feeling.  In a sense, when the first part of the bench work go up, it is a milestone for the layout; where the layout goes from dream to reality.  Bench work is also a very broad topic, and just about every layout has its own style of bench work.  However, because of this, explaining bench work fully is a hard job for anyone.  This is part of the reason I am going over several methods, to explain the variety of bench work types more clearly.

Also, each method of layout construction that I am going over has its own bench work type, or a modification of a type of bench work.  With that said, let me start explaining:

As stated above, each chosen method of layout construction that I will be covering has its own unique bench work type, but what kinds of bench work are there?

Essentially, all bench work has several things in common: a surface to attach the track, scenery, and wiring, legs, or a place for legs, and a surface for attaching fascia/ backdrops.

Also, from looking at many magazines, books, and websites, I have noticed that there are three primary types of bench work: the table top, the open grid, and the modular.  all three are shown below:

The upper left is the open grid design.  The open grid design works on the idea that the track, and scenery can be sculpted by wood and plaster to make a realistic scenery base.  I have found that this method works best for mountainous terrain, where there is a big difference in vertical height.  The reason why this style of bench work works best for vertical scenery, is because the open grid can have things attach to it that will support scenery.  This also helps make the layout light weight.  The layout construction styles that work best for this type of bench work is:  the cookie cutter, the foam and plaster, and the paper shell methods.

The upper right diagram shows and example of table top bench work.  Table top bench work takes a piece of material, usually a piece of plywood, but also foam board, serve as a layout base.  This style of bench work works best for the following:  table top (duh), and the foam board method.  I have also built layouts that have a table top to them, and use a modified cookie cutter style of construction, where the plywood surface serves as the support for the track bed, rather than the braces.

And finally, the bottom part shows an example of modular, or sectional bench work.  The difference between sectional and modular is that modular allows for sections to be put anywhere on the layout, in any combination.  Sectional bench work is more like a puzzle, where each piece has its own place.  Regardless of Whether the layout is sectional or modular, the main focus is on weight and portability.  Though I have built a sectional layout with the table top bench work style, most layouts of this type use a modification of the cookie cutter, and the foam and plaster construction methods.

So now that we have the confusion of what type of bench work goes with what type of scenery base, I can now explain in detail each type of bench work.

Open Grid


I have no real life examples of the open grid, so instead I'll include a series of diagrams.

Essentially, there are two parts to this bench work: the grid lattice, and the leg assemblies.  The grid lattice is basically a bunch or 1X4's  or 1X3's built to the following pattern:

The diagram on the left is the top view, looking down.  There are runners, as I call them, that go the length of the layout.  Then there are the trusses, which go from one runner to the other.  these trusses support the whole  scenery base as shown in the lower right view.  This view, is demonstrating the process of the foam and plaster construction method.

The upper right view shows how the legs and trusses are attached to the runners.  There are scres, or bolts going from: the truss into the leg, the runner into the truss, and the runner into the leg.  This forms a very sturdy joint, which when used throughout the layout, will give the surface very rugged, sturdy support.  I wouldn't go dancing on it, but it will be quite stable.

Shelf layouts can also be built using this method of construction.  The shelf brackets can attach to a truss that has been reinforced, or is made with thicker wood.  That way, the layout's weight won't strip the joints with the weight of the scenery base.  This method of bench work construction also will give any layout a lighter weight than if made any other way.

Table Top


This style of bench work uses a top on the grid, reinforcing the sub structure and giving a modeler a nice canvas to create his or her model railroad empire.  I have some real life examples below:

 Here is a layout I had seen at a train show a while back.  the whole layout was about 2X5 feet, and was nothing more than a piece of 2" thick foam on an open grid bench work.  It operated quite well.
 One of my cousins had gotten his first train set, and wanted to set it up.  So I helped him and together we created a literal table top layout.  some drywall was used to go between the two coffee tables.
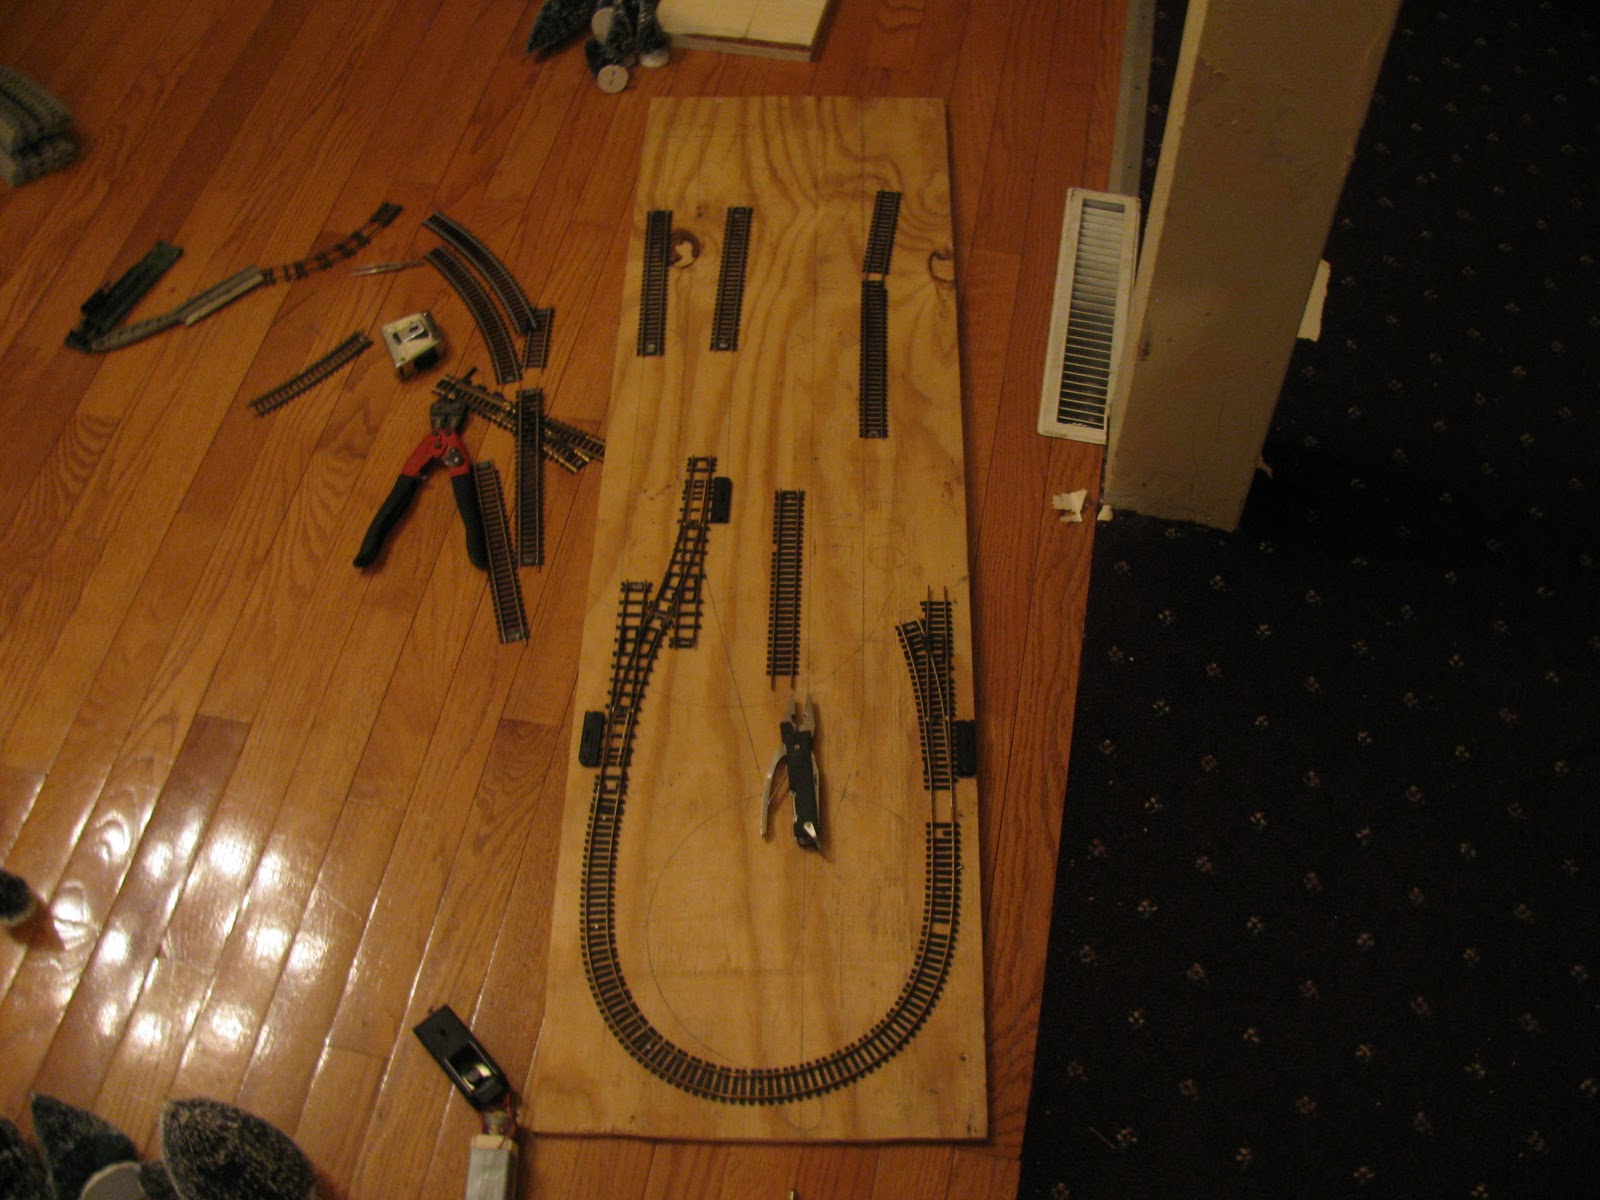
 This is a layout which never got anywhere. is was going to be a GN15 layout, built on nothing more than plywood.
 The South Dakota State Railroad Museum layout is a table top design in the classic sense.  It has reinforced plywood with foam on top.  The draw back to this design is that the layout is very heavy.  But fortunately, we don't need to move it very often.
My own home layout was built on a 2" piece of foam.  as you can see, the foam allows the scenery to be more than North Dakota flat, and allows for rivers, mountains, and valleys to be sculpted.  The only draw back here is that the foam is very messy.


As you can see, there are many ways to build a table top layout.  It figures because this style of layout is the first ever used, and has gone through many changes through the years.  Aside from the table top surface, these layouts are built similarly to the open grid layouts.  For a shelf layout design, this can be made practical, but the weight can become too much.

Modular or Sectional


Modular layouts are used by clubs, and individuals across the country who travel to train shows.  They are made to be, light weight, portable, and rugged.  My old club in Minnesota used a table top variation that gave each section the look of a cart.  The "carts" would hold the scenery base, and allowed for storage underneath.  Unfortunately, this idea does require a trailer, unless you only have two or three sections.

NMRA has standards for modular layouts, and you can look them up, here: http://www.nmra.org/standards/modules/ms_intro.html

Sectional layouts is the other branch of this style of bench work.  Both O scale layouts I have are sectional, and for good reason.  Sectional layouts allow for a large layout to be built, ad operated; then it also allows the layout to be moved to a different place.  Sectional layouts do require certain sections to be present, such as curve sections, or a yard ladder.  This means that X number of sections are required for the layout to work.

My latest O scale layout combated this problem by the use of standards of the track.
 Her is one of the sections, from the underside.  The frame serves the purpose of supporting the ply wood, and transferring the weight down to the legs, which would stick out at us from this angle.
 In order to makes sure that the track would line up, I put both sections together and then screwed the track down.
 The two sections were connected by two bolts.  Later I found that the middle sags a bit, so I added a fifth leg to the primary module, which hosts the power supply and track wiring.
 The legs were bolted to the inside frame, and believe it or not, the layout was quite sturdy on its own.

If I were to extend the layout and add more sections, I would build the new sections from the ground up, between the two end sections which would allow for the track to be measured and made secure, while still being in line. with the other track on the already built sections.

As you can see, there are several ways to build bench work.  I'm sure that many of you are creative, and will modify the bench work types discussed here.  as long as it is sturdy, it will work.  Just remember that, if nothing else.

Sunday, March 25, 2012

Part 2, Planning a Model Railroad.

Introduction


My favorite thing to do in this hobby is plan for model railroads that, for the most part, will never be built.  I use this part of the hobby to refine my skills at figuring out how yards, tracks, cities and everything else are built for when I build a real model railroad.  That being said, this topic is no stranger to me than the interior of my own car and I have done articles on planning several times on this blog.  However, what I have not done as of yet is fully explain the planning process.

Planning your model railroad is often important.  Though some people manage to get by without much thought of what track goes where, most of us use some method of planning.  Here I will go over the two big methods of planning a railroad: planning with paper, and 1:1 scale planning on the layout.  Both have their benefits and down falls, and I will also go over that too.  Finally, remember the five methods of construction I will be discussing?  I will also be going over which method of planning works best for different construction methods.

On the other hand, it is also important to not get stuck in planning.  I often have this problem, but I slap my self, and say, "good enough," after a time.  If this ever happens to you, just take a deep breath and promise yourself everything will be fine.

Prior to planning the railroad itself, it is time now to answer several questions:


  • What scale will be used?  This is important as scale dictates the size of the layout, the type of materials used, and what it will look like.
  • What era will the layout be?  You can divide the timeline of railroad history many ways.  But at the most basic level, will you model steam (prior to 1949), transition (1950-1965), or modern diesel (1965 onward) eras?
  • How big will the layout space be?  This is VERY important on so many levels, it might require its own article.
With those questions behind you, now you should think about what you want in a railroad:

First part, the elements of a railroad.

I did an article way back about what elements go into a railroad.  There are visual elements and practical elements.  

Strictly visual elements:
  • Scenery
  • Buildings (any building not owned or serviced by the railroad)
  • Water
  • Backdrop/ fascia.
None of these elements affect train operation, but these do:
  • yards:  
  • mainlines:  
  • industries:  
  • storage/ staging:  
  • curves:  
  • construction:
So let's start with the visual elements.  Visual elements are more of an aesthetic pleasure to the eye rather than having a true, useful purpose.  These are elements which are often put in place last, like the ground cover, or the color of the water seen in a river.  They do not affect train operation in any way, and therefore are necessary on the layout, but is there for one reason, to make the trains look good.  

Scenery
Everything in this scene is under the 'Scenery' category except for the car.

Scenery is an element that is completely visual, but is included to "complete" a railroad.  The scenery is anything seen that is not: water, buildings, or two dimensional objects like backdrops.  those others are their own elements as they have a different set of aspects to them.  So, trees, fauna, flora, and natural things are under this category.  The scenery helps make the layout look natural instead of a mass of framework and foam.

Buildings
Most of these buildings on the South Dakota State Railroad Museum's HO scale layout  are not really serviced by the model trains, therefore they are classified as 'buildings.'

Buildings, cars, and other man made objects are under this category.  Anything in this category are not really there for the trains' sake, but rather for the same purpose of scenery, to complete the layout.

Water

Water is in itself is an element of nature, with its own life and therefore should be considered separately from other natural things.  Water is also used as a transportation system, meaning that it is further different from the natural forests.

Backdrop/ Fascia

Backdrops are two dimensional representations of the landscape, while fascias provide an aesthetic appeal to the railroad.  These two things can be thought of as the trim on a house, it gives the layout character and a unique look.

So there are the natural elements, but what about the practical elements?  A good way to find practical elements on a train layout is to think of something on a railroad that could be its own, independent layout that doesn't need the assistance of anything else.  Examples would be yards and terminals which can be modeled on their own just fine.

Yards
Yards give a layout a place to make and break up trains, send them through, and preform the many maintenance tasks that real railroads go through in keeping a railroad running.

Rail yards are very important to all but the smallest train layouts.  They are the epicenter for where all trains on a layout originate (besides the staging tracks) and take up a considerable amount of space, and job opportunities for operating sessions.  With that said, yards can be thought of as their own, separate element.

Mainlines
The two tracks that circumnavigate the layout are mainlines because all other tracks connect to them.  The mainline can also be thought of as the main river, which all the tributaries flow into.

The mainline is a highway which connects the layout to itself in all places.  The mainline may not actually be modeled as a mainline, but anything that allows trains to pass in and out of a scene is a mainline on a layout.

Industry
Since a grain elevator give a railroad business, it is an industry.  Other industries not served by the railroad are less important than those which are on a model railroad, so those industries are classified as 'buildings.'

Industries give the railroad a purpose.  Most industries have buildings, but these buildings are almost required for any industry to exist, making them more practical than aesthetic. 

Staging and Storage
A staging yard represents everything you can't see, such as beyond the horizon in this photo.

Staging is quite similar to a yard, and therefore this and yards could be put together as one element.  except that if you have a decent yard, you don't really need staging.  This is only true though if the cars on a layout can all fit onto one yard, which would serve as a terminal.  Furthermore, staging and storage represent the national rail network which connects to your little piece of modeled area through the mainline and yards.  With that, staging yards and storage can be seen as their own element.

Curves
There are several reasons why the track curves.  Can you think of them?  1. The layout ends a few inches from the track, 2.  The trees mark a river which would mean the track needs to curve to get into town.  And 3.  the town is around the bend. 

Curves are important as they just take up space, and a lot of it. they dictate how wide a railroad will be, outline obstacles which a train can't go through or over, and give the trains a reason to slow down, both in real life, and on the model.  Because of these factors, curves are important when planning, constituting their place as an element on a railroad.

Construction

How the layout is constructed is the number one thing to take into consideration as it affects EVERYTHING on the layout.  This is part of the reason why I am also going over the different methods of constructing a layout, as it is important to see how X affects Y and exc...

Planning With Paper:


Track planning with paper and or computer software is the most common method of planning model railroads for several reasons:


  • It allows people to visualize the railroad without really wasting any lumber or other resources to see if it will work, or even look right in the space available.
  • This method of planning will allow a person to devise other diagrams for the railroad including diagrams from wiring, bench work, and lighting.
  • The plan can be used to explain to your family why there's a mass of lumber in the den room ;p
  • a diagram for the layout will allow a person to see what materials are needed ahead of time such as the amount of track, lumber, and solder for joints.
Track planning on paper actually has its own legend and symbols that are widely known, though everyone has their own variations.  The track plan can be thought of as a map, showing where everything on the layout is, or will be.  The legend or key to the map are the symbols which represents various things on the layout.  I have my own special key which I use, and its below:


  1. Buildings.  Important ones are labeled 
  2. Track.  Solid, thick line for exposed track, dotted line for tunnels
  3. Narrow gauge track.  Gauge and scale specified, can also be different color.
  4. Layout surface. marked by thin, continuous line with corners or curves.
  5. Elevation.  Marked as inches above the layout surface
  6. Turntable is a circle with a line through it, suggesting the pit and bridge.
  7. Rivers and water marked by a shaded area bordered by land which can be unshaded, or a green area in color.
  8. Bridges.  Marked by a suggestive trestle or girder type of border.
To me, this is relatively simple, and is a spin off from the track planning symbols used on Model Railroader track plans.  Considering its your layout, you can adapt this to anything you want if it is easier to understand, but this is my key, and yes, you are welcome to use it.

To actually draw a track plan, you can see a similar article here which gets into detail about using utensils for  accurate drawing. The alternative to this is to create a rougher sketch, but using the same symbols as above.  The beauty of my set of symbols is that they are generally understood, and account for measurements and notes about various aspects on the layout.  In other words, its universal, no matter how you use it. 

Track planning in 1:1 scale

This doesn't mean going out to a real yard and taking their track plans, though you can do that if you like, but rather taking your layout surface, and using it as a canvas for planning your empire.  Some people like this method as it gives modelers the freedom to test out different things before being certain of what they want.  It is a very good thing when you can see your layout in front of you, and test out what switch goes where and how it is best used.  I personally used this method for my own HO scale Rock Springs layout, and it worked great because I could see the pieces of track instead of being forced to visualize.  In fact, it wasn't until after the layout was operational that i made a track plan, though I don't advise that because I did have a few headaches. 

The basic idea behind this form of planning is to take the elements discussed above, and see them in action on the layout surface without the need for a track plan.

Track planning with the actual track can be great for seeing the layout rather than visualizing it.
This form of track planning only works in certain situations however, and here they are:

  • If you know how big the layout will be
  • If you know what you want already
  • If you want to see how the track looks and feels like before its too late.
This form of track planning can't work right if one of those things are impossible to complete, or are not done.


So which method of track planning works best for what construction method?  Well, here is the answer and why:

  • The table top method.  You can use both methods of track planning on this style of construction because the layout surface is already there and the track plan would be easy to create.

  • The foam board method.  With this method, you should use the 1:1 planning idea as it allows for marks to be made, cuts to the foam, and a great flow to the layout.

  • The cookie cutter method.  Track planning on paper is a good idea here for one simple reason, this way you will know what to cut.  This method of construction requires the cutting of a lot of wood, and you need something to "measure twice" with before cutting.

  • The foam and plaster method.  The 1:1 planning idea works here as the foam needs a reference to cut with.  The track, already being marked on the surface, will give a person that stencil for cutting.

  • The paper shell method.  With the need for lumber to be used as a sub-roadbed, a track plan on paper is worth just as much as a line on the layout surface.
And that is all the reason to do some planning before building your railroad.  When the planning is finished, a person can now move on to...  wait for it...  BENCH WORK!!!!

Friday, December 24, 2010

Your First Railroad Part 6.

With the track laid and hopfully operating, it is time to start building the structures.  Structures give a railroad a reason for being, for instance, my CNW layout has a gravel plant that serves a gravel pit. The gravel plant needs to be served by the railroad because it produces more gravel than trucks can carry.  In return, the plant produces ballast for the railway.  Both need each other to exist, and it makes for good operation for a model railroad.  Besides the gravel plant, a grain elevator gets a lot of attention on the layout.  It was put on a spur that was shorter than three car lengths.  This allows the switcher to continually switch around cars to increase operation.

After figuring out what structures to have on the railroad, it is time to get them.  There are three ways to getting structures on the layout. 

Built and ready structures;
These structures are already complete for the modeler.  This is good for a person that is not good at assembling models or doesn't have time to make structures.  The main draw back of built and ready structures is the cost is much more than what structures could be with the other two methods.

Kit structures;
Kits are very popular among modelers. They are cheaper than built-and-ready structures and only require a little glue and some paint.  When assembling a kit, it is best to make sure that all of the parts are there and fit properly. then, assemble the kit according to the instructions.  Kits are fun to assemble and give a modeler a sense of wholeness when the structures are complete.

Scratch building;
instead of telling scratch building is best shown.

Assembled from 1/8 inch plywood and styrene, the elevator stands 58 scale feet high

Although wood isn't yellow, this color makes a good primer.  Paint with the grain.
.
Real roofs have trim around the sides to keep moisture from going up into the structure.  Adding these add a new level of realism.

Weathered steel roofs can be modeled by painting brown, orange, red, and a little yellow on top of the steel gray. 

The finished wood structure should look worn with browns and grays.  Add styrene to the outside so that the structure looks wood cribbed.  Adding the grain loading chute completes the elevator. 

If there are any questions, please let me know in the comments. It is best to check out a book on the subject for a step by step how to, because I do it differently.

Tuesday, December 21, 2010

Your First Model Railroad Part 5.

Let's look back to see what's been done so far.  The railroad has been planned including what's going to be on it and the track plan.  The bench work has been laid out and put up, and lights are shinning down on the future railway.  This project is coming along well so far, but there is still a great deal of work to go to ''complete" the layout.  But now the railway needs some iron on it, so bring in the track laying equipment.
Track laying is almost an art inside of an art, from plastic roadbed to hand laid masterpieces, track laying puts the railroad in model railroading. However there are three methods to laying track.
Sectional track 
The first method and the best for beginners uses sectional track.  this method is the simplest because most modern sectional track uses plastic roadbed.  Personally, I prefer to use track with out the roadbed because ballast looks better when it is not a mold, however I do think that Sectional track with roadbed is a good method for a first time railroader.  Good manufacturers of sectional track with roadbed include;

  •  Atlas with N, HO scales Super Snap track
  • Bachmann with N, HO, On30 scales E-Z Track
  • Life Like with HO scale Power Loc track
  • Lionel with O scale Fastrack
  • MTH with O scale Realtrax

When laying track that already has roadbed on it, glue the track down to the table-top on the ridges on the bottom, after the glue dries, add cinders and other materials in the right-of-way to make the track realistic. For road Crossings, build up plaster to the tops of the rails to form a gentle ramp (leave room on the inside of rails for wheel flanges).  When wiring, just attach connection at one place on the layout and at: switch backs, sidings, yards, and at the end of ALL spurs.  This will keep electricity in the rails of all of the track.
Flex Track Method;
This is probably the most economical way of laying track, but you still must ballast.  For this method, you will need some sort of material to raise the track off the table top. road bed from several manufacturers is available to use and it is cheap.  To install flex track, first draw the center line of the track on the layout surface so that all of the switches and spurs are exactly where they should be like on the track plan.  After this is complete, glue down the roadbed making sure that it is centered on the line. after that take the first piece of flex track and glue it down on a straight section of roadbed, this acts like an anchor for curves. continue this until you come to your first switch or curve.  For a switch, glue it down before the connecting piece of track, avoid gluing the points and switch throws to the layout (if that happens, good luck getting the switch to throw).  Then cut the connecting piece of track to length and place it in its spot on the layout.  When you approach a curve, bend the piece to match the roadbed, then cut the rails even. after that glue down the piece of cut flex track and tack down the flex track to keep it from moving.  another way to make a curve is to use sectional track that has no roadbed (Atlas is the best manufacturer of sectional track without roadbed) and connect the pieces to form a curve.  This works for anything under 24" radius.  Other wise just use Flex track.
Hand laid method;
This method gives the most realism, but hard work is what keeps most from using this method.  The biggest challenge when hand laying track is keeping the gauge consistent.  I would recommend using a preformed tie every few inches.  After the track has been nailed to the track, the plastic tie can be removed.  To get more info, one should find a friend that knows how to lay hand built track, it is just one of those things that is easier to learn from watching rather than reading.

The next step in track laying is ballasting. real railroads use ballast to keep the track from being submerged in water, ballast also distributes the weight of the train to the right-of-way.  this means that ballast is important to railroads.  however ballast differs in time and era.  During the steam age, railroads often used cinders from the ash pits of locomotives as ballast on spurs and secondary lines, however, main lines still needed something denser to hold the track in place due to higher speeds.  On the CNW, a gravel pit in Rock Springs, Wisconsin supplied Pink Lady Quartz gravel to use on all of the main lines.  After the CNW got bought out, the gravel plant stayed open, supplying gravel to the former CNW lines because the Quartz would grind up new ballast because Quartz is one of the densest rocks on the planet.  Because of the ballast, the future of the CNW line through Rock Springs was changed.  So is ballast important to a railroad? Yes!!!

So now that the importance of ballast has been stated and explained, let's see how to apply it correctly to model track.
To apply ballast, paste glue on to the surface of steep hills sides and cliffs that ballast will not stick too.  After that, take a small cup and pour ballast between the rails, then take a ruler or other flat object, stand it on edge, and level the ballast to the rails.  After doing that, take a brush and sweep the ballast between the rails, uncovering the ties and the insides of the rails.  This allows the Ballast to roll down slops naturally, like in the real world.  refer to the picture below;

Now that the ballast has been put on the track, it is time to glue all of the loose rocks to the ground. to do this, mix glue and water at a 1:3 ratio and dribble over the track, trying to avoid the tops of the rails and switch points.  It is best to practice this on a few pieces that are not going to be used heavily first because if not done correctly and too much glue is on rails will inhibit electrical flow and is a pain to get off once on.  After the glue dries, take a screw driver ad rasp at the inside of the rails to get any rocks away from where the flanges will run on the track.  lastly, take a track eraser and wipe the rails clean, then test the Track with a variety of rolling stock and locomotives.  If all goes well, keep doing this until the railine is ballasted throughout the layout.
Next up, structures.

Monday, December 20, 2010

Your First Railroad Part 4.

After the bench work has been laid, it is time to figure out your power.  Like most things today, electricity powers most appliances and model trains are no exception.  But there are also other ways to power your trains.
Live Steam;
Popular in the garden railroading community.  Live steam literally powers locomotives by steam from a fire, just like in the real world.  However, anything below 1/48 scale gets a little too small for live steam, and so has largely remained in the garden railroading section of the hobby.
Battery:
A form of electricity that is stored in a little package. This has become another favorite in garden railroading because the batteries remain light enough that the motors can pull the battery as well as a train.  However you would never be able to do this in anything less than O scale.
AC electricity;
AC electricity has become the standard method of power to O and S scale trains.  AC is different than DC in that, AC alternates the direction of current a few thousand times every second.  This enables the electricity to flow farther and cleaner than DC.  however, there are draw-backs.  AC motors are a lot noisier than DC motors, and the power pack cannot be used with any other scale.
DC electricity:
DC electricity is by far the most popular method of powering trains.  The motors are quiet, LED lights can be used, boosters can beef up the amperes.  used in every scale except O and S, DC electricity dominates the market, but there is one more method of power that might just take the thrown.
DCC:
DCC in recent years has increasingly become more popular along with the knuckle couplers. DCC works by transmitting signals on DC current to specific locomotives on the track.  These signals are read by a decoder which relays the signal into functions that control light, sound, speed, direction, and even radio crackling.  This system has become popular because it allows engines within the same block to operate independently, something that could never be done with AC or DC power.  this is also the recommended choice for anyone who wants either, A; cool functions that make operation realistic. or B; want independent control of different locomotives. Or you can have both A and B on your layout.  for On30, HO, and N scale, locomotives are available that are already equipped for DCC.  The manufacturer of these locomotives is Bachmann, however, Athern and Atlas are starting the same thing.  You can even use old locomotives, just put in a decoder and it is ready to go.
My favorite DCC system that you can use go as following;
NCE power cab; MRSP: $189
NCE has recently produced a very nice starter system.  Many locomotives can be at your control, and with plug sockets and a three Amp booster, you can easily expand to include up to three other throttles.
Digitrax Zephyr; MRSP: $199
Digitrax was one of the first to explore starter systems for DCC.  Their basic set may not look like much however throttles and boosters are available so that it can be upgraded to something similar to Digitrax larger sets.
Bachmann E-Z Command; MRSP: $120

Although a good set it does have its limits. E-Z Command can only support ten locomotives in its memory and can only have one more throttle.  but it is cheap and a great way to start if you are sceptical about DCC.  But just so that I am not knocking Bachmann, they did create the Dynamis which is one of the best starter systems for wireless throttles on the market to date.
Easy DCC's BSS: MRSP: $280

The Easy DCC BSS is a good system that makes your layout look professional.  It includes a double throttle command station with buttons to control loco addresses and functions.  This system is highly expand able to include both tethered and wireless throttles, Boosters are available, however the BSS already has a large 5 Amps of power, much more than most starter systems.
For more info on DCC systems, buy the Nov.08 issue of Model Railroader Magazine.

Those people that run O scale also have two similar systems to choose from that will allow the railroad to operate like DCC.
Lionel Legacy Control; MRSP: $350.00

by far, Lionel is one of the best known train Manufacturers in history.  Lionel is almost a household name.  So it is natural that the best creates the best wireless control systems. And that is just what Lionel did, Lionel created the Legacy system to upgrade from their famous TMCC which dominated the market of the 1990's and early 2000's.  Is it better than its rivals? Depends on what side your on.
MTH DCS:  MRSP $299.99

MTH, better known as Mike's Train house, has created a very good rival to the legacy control.  This system allows for four DCS tracks or two DCS tracks and two analog tracks.  This means that an operator can control non-DCS equipped locomotives to run with out modification, something that has a few troubles when operating Legacy Control.

So which system is better?  the answer depends on who you ask, a classic O scale Operator will likely want Legacy, however, if you ask a young club or new operator DCS will be the system of choice.  in order to decide for yourself, it is best to try out both at a club or hobby shop.

After power has been selected, time to buy the track and get to track laying.  But be sure to read part 5.

Saturday, December 18, 2010

Your First Railroad Part 3.

Now that every thing as been planned out, right down to track placement, it is time to get the room ready.
To have the proper environment, one should make sure that very good lighting is in place so that viewers can see the layout well. The best way to do this is to bring the lighting in front of the layout so that everything that faces the audience is illuminated.  Doing this also keeps unwanted shadows off the layout.  As to what kind of light, fluorescent lighting is best because of the fact that it is cleaner, brings a cooler atmosphere to the layout, and that it does not produce as much heat as regular light bulbs.  Carpeting on a floor is a very welcome comfort that many forget about.  Walls that have been painted white or light blue help to reflect the light back towards the layout. painting the walls black can do a whole lot too, focusing the eye toward the layout.

The second step to any model railroad is building the benchwork.  Benchwork is the foundation that gives the layout its height and support.  When building benchwork it is wise to have a three point support system.  By this I mean that the legs should be supported in three places.  However there are different ways to support a train layout.  Shelf layouts are used when a modeler doesn't want legs. Basically, a shelf layout is a string of shelves that raps around the walls of a room to form the layout surface.

The table top has many methods to supporting scenery, from the classic table top to the innovative, L-girder style.  A good idea is to look at a how to book on specifically benchwork to get an idea as to what the various methods are.  On my layout, I used a door that was later covered in two inches of foam board (the railroader's secret weapon).

For garden Railroads, the equivalent would be taking dirt and filling in all of the railroad's foot print.  When doing this it is important to build a retaining wall.  But this is for another day.

When building benchwork, it is important to keep a few things in mind:


  • If joints are necessary, use screws instead of nails.  Screws pull the would together to stay in while nails act like a wedge to stay in.  This means that the nails will work their way out.
  • Keep legs away from the outside edges.  Just like a table, legs on the edge of the bench-work will be in the way and greatly increase the chance of tripping.
  • Keep weight in mind.  My very first train layout was built as a 4x5 n scale railroad modeling the southwest, but it was in excess of 160lbs!  This was largely due to the fact that the layout was built from 3/4'' ply-wood and plaster that was in some places 3" deep.
  • ALWAYS, provide space for wiring and control.  My first few layouts never had a place on the edges to put a controller or any fancy wiring.  My point here is to have lumber along the edge to support these things.
  • Make duck-unders high.  A duck-under is a place where people can go below the railroad tracks to get to the center of the layout.  But as people get older, their backs get tighter and cannot bend as far. so keep the bottom of the layout a minimum of about 48" in the area where people need to cross, but higher is better.  This could be accomplished through helixes or a grade rising up to that height.
  • leave isles wide enough for two people to pass.  Anyplace where a layout comes out from a wall, an isle is formed between the resulting peninsula and another peninsula or wall.  The isle should be a minimum of 42" across in low traffic areas and 48" in high traffic areas.  Some yard areas may need even more if you have many operators.
  • Make the overall height better for your audience to see or put chairs and steps for those who cannot see above the layout.  So I wouldn't put Tomas the tank engine on a layout that is 56" high, and don't run the City Of New Orleans on 30" benches. With these things in mind, start designing bench-work that will be great for you and/or those that will see your masterpiece.

Your First Railroad Part 2.

After deciding what you want in your model railroad, it is time to plan where exactly the trains will go and to double check that the space will work.  First measure out the space that you selected in part 1.  From here you can design the track plan of the layout. Modelers use track plans to determine where the track on the layout will run its course.  The track plan itself is a simple diagram showing the overall view of the layout and the track parts needed to build the plan.  There are two ways that modelers usually create track plans to build their layout.
The first method is my favorite, free hand draw where you want the track to go.  This is what experienced modelers use and I recommend any individual to at least try to create their own plan.  All you have to do is take a pen and paper and draw out a line representing the track.  See my post about track-planing at: http://jjwtrains.blogspot.com/2011/02/art-of-track-planning.html . There are a few things that anyone should know before attempting to draw:

  • Reverse loops and Wye's: 

If you are designing a three rail O scale layout you can have these with little trouble, Scale modelers for 2 rail track need to watch for these things.  Basically a reverse loop is used to turn a whole train around.  Although it works in real life, your train will short out because the tracks deliver power to the train, one rail is +, while the other is -, so when the two rails meet, the electricity shorts out because + meets-.  Picture a reverse loop like this: apiece of flex track is bent to form a lobe that connects to the diverging routes of a switch.

  • Spurs in same direction:

In this picture the switch is pointing "away" from the front of the train making it easier to switch cars.

This photo shows the front of the train "facing" the switch.  in order for cars to be switched, the engine will have to  run around to the other end somehow.
The one thing that a lot of people forget is that spurs that the train can simply back into are not nearly as challenging as a spur that the locomotive must run around the train in order to back cars into the spur. So try to make spurs go in opposite directions. note; Most plans that you get in books have this problem. However, if you like the look of one of those plans, just switch the direction of a few of the spurs (roughly half).

  • Clearance: 

This problem may not be so big because you can see it easily on the train layout during construction.  If you run into this problem, just move the obstruction a 1/2 inch or so. if a train is hitting a bridge as it is coming out of a curve, try to add a short straight section between the curve and the bridge.
if a bridge is too low and the train is hitting it as the train travels under the bridge, try to make the grade leading to the bridge a LITTLE steeper.  This makes the bridge higher and will allow the train under.  and don't worry about the grade, anything under 5% should be negotiable to most engines.


  • The track plan is only a reference:

Too many people get stuck into making the plan exact,  little changes will not hurt future plans in any way.

The second way to get a track plan is to look at one on the web or in a book. 101 track plans is great as well as magazines such as Model Railroader, and Classic Toy Trains. being aware of the same things as above, select a track plan and try to fit it as closely as possible into your given space. this is a very good option if one isn't good with paper.

After getting a plan made, be sure that it fits into the selected space.  make sure that the layout is not wider than three feet up against a wall and make sure that it is not wider that six on a peninsula.  Just make sure that  EVERY place on the layout is accessible. A train will eventually stop or derail in any place you can't reach.

So now that everything has been planned out, it is time to start building.

Friday, December 17, 2010

Your First Railroad Part 1.

After experiencing the taste that model railroading gives many, some may want to start their own train layout.  The first step, though, is not building the layout, but rather planning (like a major home project).
Within planning, there are several factors to take into consideration.
Space:

Space is probably the main limiting factor that a modeler faces.  Because of this, it is important to know how big of a space you have altogether.  You may only have a 1X4 window sill to place a layout, or you may have a two car garage which isn't being used.  Try, if you can, to get the largest space possible.  You can even run your trains outside with the top three largest scales, 7/8", G, and O.

Materials:

It is a good idea to know what you need for your railroad.  Foam, Lumber, Wire, Track, Buildings, scenery are all important materials to a completed railroad.  This also includes tools, so you will want at the least, a screw driver, small saw, and a pair of pliers.  Also, see my list of tools for building and maintaining a railroad.

Skills:
Are you handy with a saw and drill?  If not, perhaps a layout kit is necessary to start a model railroad.  Mod-u-rail is a good choice for that, or you can get an NMRA layout kit.

Scale:
Although the above choices influence what scale you want to model, eyesight and dexterity also needs to go into consideration. Anything from Z to G is plausible at the beginning, but later it might be only N or HO that you can use to model.   The most common scales you will find in the U.S. are from largest to smallest: 7/8" (1:13.5), G (1:22), O (1:48), S (1:64), On30 (1:48), HO (1:87.1), N (1:160), Z (1:220), T (1:450) and  and the Lego is roughly 1:32 Scale (Yes people do "model" in Lego).  In order to decide which scale you want to model, I suggest going to a club or train show and experiencing first hand most of the scales out there.  This will allow a person to get a good feeling for the scale spectrum as well as an idea as to the space a scale train takes up.  The majority of railroaders now-a-days choose N or HO scale for  two reasons:

  • Both scales can have dramatic scenery which dwarfs the trains, all in a smallish area.
  • Both scales are on the low cost side, making them affordable to virtually everyone. 

The next step that I do when building a railroad, is I go online and look for places to model or find a prototype on Google Maps.  Here are the coordinates to a few of my favorite places (just copy and paste onto the search box in Google Maps):

Minneapolis, MN 55401  This is the site of the Washburn A mill, or the Mill City Museum.  It at one point had 32 tracks!

Rapid City, SD 57701  Here is my local grain elevator.  Around the elevator, there are plenty of other modeling opportunities.

North Freedom, WI 53951  And this is the railroad museum at Rock Springs, WI. There are plenty of tracks to model.

When you find the tracks, keep looking around and you will be surprised as to what you find!

You can also go to museums or sites that are of railroad importance.  here I am sure anyone looking for a model railroad will find a prototype.


In part two we will decide the track plan and make sure everything is ready before building begins.